Table of Contents
I. Introduction
A mechanical keyboard is a valuable investment that offers superior typing experience and durability. In order to keep your keyboard working well for a long time and performing at its best, it’s important to regularly take care of it through proper maintenance. One essential aspect of maintenance is removing the keys for cleaning and customization purposes.
By removing the keys, you can effectively clean the keyboard, removing dirt, debris, and spills that accumulate over time. Additionally, keycap removal allows for customization, allowing you to replace keycaps with ones that suit your style and preferences.
II. Understanding Mechanical Keyboards
Brief overview of mechanical keyboards: Mechanical keyboards use individual mechanical switches beneath each keycap, providing tactile feedback and improved durability compared to membrane keyboards. Understanding the basic structure of a mechanical keyboard helps in better understanding the process of removing keys.
Different keycap mounting styles and switches: Mechanical keyboards can have various keycap mounting styles, such as Cherry MX, Topre, or Alps. Each mounting style may require a slightly different approach for keycap removal. Additionally, there are different types of switches, such as linear, tactile, and clicky switches, which may impact the keycap removal process.
Advantages of mechanical keyboards over other types: Highlight the advantages of mechanical keyboards, including better typing feel, increased accuracy, and longer lifespan compared to membrane or scissor-switch keyboards.
III. Tools Required for Keycap Removal
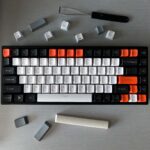
Keycap pullers (wire and plastic): Keycap pullers are essential tools for safely removing keycaps without causing any damage. There are two common types: wire keycap pullers and plastic keycap pullers.
Compressed air can or soft brush: These tools help remove dust and debris from the keyboard and keycaps before and after the keycap removal process.
Isopropyl alcohol and cleaning solution: Isopropyl alcohol, mixed with water to create a cleaning solution, is effective for removing grime and stains from keycaps.
Microfiber cloth or cotton swabs: These tools are used for cleaning and drying the keycaps after they have been removed.
IV. Preparing for Keycap Removal
Disconnecting the keyboard from the computer: Before starting the keycap removal process, it’s crucial to disconnect the keyboard from the computer or turn off the wireless connection. This prevents accidental keystrokes during the process.
Reading the manufacturer’s manual for specific instructions: Different mechanical keyboards may have unique designs or keycap removal methods. Refer to the manufacturer’s manual or online resources for any specific instructions or precautions.
Setting up a clean and organized workspace: Create a clean and organized workspace with ample lighting. This will make it easier to keep track of the keycaps and ensure a smooth keycap removal process.
V. Step-by-Step Guide to Removing Keycaps
A. Identifying the Keycap Mounting Style: Different mechanical keyboards use various keycap mounting styles. Understanding the mounting style helps determine the appropriate method for keycap removal.
Cherry MX: Provide an overview of Cherry MX keycap mounting and mention its prevalence in mechanical keyboards.
Topre: Discuss the keycap mounting style used in Topre keyboards and its distinct characteristics.
Alps: Explain the keycap mounting style used in Alps keyboards, highlighting its unique features.
B. Using a Wire Keycap Puller: This section describes the step-by-step process of removing keycaps using a wire keycap puller.
Positioning the keycap puller: Place the wires of the keycap puller on both sides of the keycap you want to remove.
Applying gentle upward pressure: Hold the keyboard steady with one hand and slowly pull upward on the keycap puller to dislodge the keycap.
Removing keycaps one by one: Repeat the process for each keycap you want to remove, ensuring a gentle and careful approach.
C. Using a Plastic Keycap Puller: This section provides instructions for using a plastic keycap puller, which is an alternative to the wire keycap puller.
Positioning the plastic keycap puller: Place the plastic keycap puller over the keycap you wish to remove.
Applying even pressure: Press down firmly and evenly on the keycap puller to detach the keycap from the switch.
Removing keycaps systematically: Continue removing the keycaps using the plastic keycap puller, following a systematic approach.
VI. Cleaning the Keycaps

A. Preparing the Cleaning Solution: This section explains how to create a cleaning solution using isopropyl alcohol and water.
Mixing isopropyl alcohol and water: Create a cleaning solution by mixing isopropyl alcohol and water in a suitable container, maintaining the right concentration.
B. Soaking and Scrubbing the Keycaps: The step-by-step process of cleaning keycaps is covered in this section.
Submerging keycaps in the cleaning solution: Place the keycaps in the cleaning solution, ensuring they are fully submerged.
Using a soft brush or cotton swabs to remove dirt: Gently scrub the keycaps using a soft brush or cotton swabs, paying attention to any stubborn stains or grime.
Rinsing the keycaps and drying them properly: Rinse the keycaps with clean water to remove any residual cleaning solution. Dry the keycaps thoroughly using a microfiber cloth or by allowing them to air dry.
VII. Reinstalling the Keycaps
Aligning keycaps with their corresponding switches: Match each keycap with the corresponding switch on the keyboard, ensuring proper alignment.
Applying even pressure to secure the keycaps: Press down firmly on each keycap until you hear a satisfying click, indicating that it is securely in place.
Testing the keys for proper functionality: After reinstalling the keycaps, test each key to ensure they register correctly and there are no issues with their functionality.
VIII. Tips and Precautions
Avoid using excessive force during keycap removal: Applying excessive force can damage the switches or keycap stems. Use gentle and controlled pressure.
Keeping track of the removed keycaps: To prevent confusion during reinstallation, consider arranging the removed keycaps in a logical order or using a keycap sorting tray.
Regularly cleaning and maintaining the keyboard: Keycap removal is just one part of keyboard maintenance. Encourage readers to regularly clean their keyboards and keep them free from dust and debris.
IX. Conclusion
In conclusion, knowing how to remove keys from a mechanical keyboard is an essential skill for keyboard enthusiasts and users who want to keep their keyboards in optimal condition. By following the step-by-step guide outlined in this article, you can safely remove the keycaps for cleaning, maintenance, or customization purposes.
Proper keycap removal involves identifying the keycap mounting style, using the appropriate keycap puller (wire or plastic), and applying gentle and controlled pressure. It is crucial to disconnect the keyboard from the computer and set up a clean workspace before starting the process. Additionally, cleaning the keycaps with a suitable solution, rinsing them, and allowing them to dry thoroughly is essential for maintaining cleanliness and longevity.
Reinstalling the keycaps requires aligning them correctly with their corresponding switches and ensuring they are securely pressed into place. Testing the keys afterward helps confirm proper functionality. By following these steps and incorporating regular keyboard maintenance, you can enjoy a clean and optimized typing experience.
Remember to exercise caution and consult the manufacturer’s manual for any specific instructions or recommendations regarding keycap removal. Taking proper care of your mechanical keyboard will not only prolong its lifespan but also enhance your overall typing satisfaction.
Thank you for reading our guide on how to remove keys from a mechanical keyboard. We hope you found it informative and helpful in maintaining your keyboard’s performance and appearance.
FAQs
◾ Can I remove all the keycaps from my mechanical keyboard?
Yes, you can remove all the keycaps from your mechanical keyboard using the appropriate keycap puller.
◾ How often should I clean my keycaps?
It is recommended to clean the keycaps periodically, especially if you notice dirt or debris accumulating on them. Aim for cleaning them every few months or as needed.
◾ Are there any risks involved in removing keycaps?
When done carefully and following the proper steps, removing keycaps poses minimal risk to your keyboard. Just ensure you handle them gently to avoid damaging the switches.
◾ Can I replace the keycaps with different ones?
Yes, mechanical keyboards often allow for keycap customization, so you can replace them with different keycaps to suit your preferences.
◾ What is the best method to dry the keycaps after cleaning?
It is best to let the keycaps air dry or use a soft cloth to pat them dry. Avoid using a hairdryer or excessive heat, as it may damage the keycaps.
Note:
Remember to always refer to your keyboard’s manual for any specific instructions or precautions regarding keycap removal and maintenance. Enjoy a clean and optimized typing experience with your mechanical keyboard!